Wednesday, October 30, 2013

Stained Beams and Engagement Party Ideas

I have spent the last 4 days staining the beams in our great room, you can see the before and after below. I used Minwax "Dark Walnut", it really brought out the true beauty of these 150 year old beams. 


We are going to lay plank boards on the top of the beams,  I am going to paint the planks white, I wanted a big contrast between the dark beams and the white planks. Sort of like in the picture below from 1900farmhouse.blogspot.com, except I think our planks will be a bit wider. 


Image from 1900farmhouse.blogspot.com
Neal finished up all the electrical on Saturday and we started hanging the drywall last night. As my son and husband hear me say quite often when we are making progress, I feel like "we are getting somewhere"!


I also wanted to show you some pictures of my sister's house. She put on an absolutely beautiful engagement party for my niece two weekends ago and I ran around with my camera snapping some shots before everyone arrived.


She lives in a turn of the century Victorian that she has impecably restored. I love the banner that she made and told her I wanted one ASAP:)


She had so many cute ideas for the party, and like I said I only had a minute to take some pictures so these are just some of them.


My sister is super duper talented, she had hand made signs and banners everywhere you looked.


The room she had the party in is absolutely beautiful and I plan to show you the whole thing one day. We clearly have different decorating styles, I don't know if there is a single white piece of furniture in her house actually. But we are both unceasingly obsessed with decorating and love seeing what the other one is currently working on and bouncing ideas off of each other.

Okay well it is back to staining for me, as I was typing this I noticed how lovely my hands look....they are black from the stain, not a good look:)


Friday, October 25, 2013

Ironstone Hutch


When we took down the wall in our kitchen we had to move the big antique hutch that we had in there. We moved it into our dining room and you have seen it in lots of my blog pictures but I thought it deserved it's very own post.


This amazing hutch was in the house when we bought it, screwed to the wall in the room we are now renovating. When we first walked through the house before purchase I spotted it and was beyond excited to find out that yes it would come with house ( I had decided I wanted the house already, I actually new when we pulled in the driveway). All of the houses contents were auctioned off sadly before we even knew of the place. But since this beauty was screwed to the wall it was all mine.


Definitely hand made, original blown glass doors, what is not to love? I always dreamed of having an old cupboard full of ironstone and this one couldn't make me happier.


I painted it Martha Stewart's Bedford Gray on the outside. And I have always liked when people put white dishes inside a dark cupboard, like this....


Nancy Fishelson Designs 


However.... I think I am going to paint the inside of this. The wood is dark but it has a 1970's shellacked look to, plus a musty smell that I can't get rid of no matter what I scrub it with. I am in the middle of painting the giant cupboard that goes into our kitchen/great room right now so it might be a week or two till I get to it. Or while I have the paint brush in my hand I might just do this too.


We got six inches of snow here yesterday...that's Edinboro for you:) Okay by me though lots to do inside. I hope to have some pictures of the kitchen/great room progress for you by the end of the weekend. I don't know about you but I am glad it is Friday!

Friday, October 18, 2013

Autumn Guest Bedroom


I wanted to share with you some recent changes that I made to our guest room. I'll start with the amazing doors seen pictured below. I bought them at the flea market this past summer and Neal is going to make a cupboard for them but for now I just have them propped against the bookcase in here. They are just too pretty to be hidden away until the day Neal will actually have the time to make the cupboard. To say I LOVE them would be an understatement!


The mirror is a thrift store buy from years back and has been in our garage up until two days ago. I just never liked it, it was brown with pink flowers and I tried selling it multiple times to no avail.  I thought people loved these kinds of mirrors, but I guess not around here. Anyways it worked out because I needed something long for above the bed and I painted it "Bone Folder" by Martha Stewart and now I actually love it.


I folded an antique piece of French ticking over and placed it at the foot of the bed. I just can't get enough French ticking....why is so hard to find reproduction French ticking!!!


I wanted to cozy up the bedding a little bit and wanted some linens that had a little bit of tan and red in them. I found the plaid sheets and pillow cases at Walmart actually, they are sold individually so even if you just wanted to add some color with your pillow cases you could.


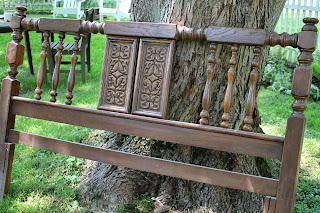
The 100% linen dust ruffle was a $1 at the Goodwill...I am quite excited about that find! And the wooden bed frame was recent yard sale find. You can see it pictured below in all its beauty.


It had this hideous center panel that was faux wood but the rest is solid wood and super well made (and super heavy, I had to carry it quite far to my car). I figured I could work around the faux wood and bought it for $8. Turns out it was attached with screws so I just unscrewed it and had Neal cut a piece of scrap wood to fit in place of it.


I then painted it Martha Stewarts "Bone Folder", it is one of my favorite go to whites.


I found the wicker hamper at Letchworth Barn Antiques on a recent road trip...it is the perfect hiding place for my husbands dirty work shirts till I can get to them. I stacked some of my slow growing collection of red and white linens on top.


Not much different on the other side of the room, I changed the mirror and placed some ironstone and an antique basket with French linens on the dresser. I feel I achieved my goal of cozying it up in here. Who says autumn has to be orange?


*** I have been getting lots of emails about my wall colors, in this room walls and floors are painted "Sisal" by Martha Stewart available at Home Depot.

Thursday, October 17, 2013

Monday, October 14, 2013

A Productive Weekend


Thanks to some absolutely beautiful weather here this past weekend we were able to accomplish quite a lot.

I finally got the porch painted for one thing.


I had picked up two different "Mistint/Oops" clearance stains that I thought might work. I knew I wanted the color to compliment Neal's stone work so it needed to be a grayish tan. The one stain I bought was too gray and the other was too tan...so I mixed them together and came up the color you see on the wood below.


The color is sort of sort of gray, sort of blue and sort of green, just like stone can be and I love the way they look together.  I plan to show you the whole thing eventually but keep in mind right now this part of our house is covered in Tyvek...not picture worthy. I sit out here quite often though and can't help but make things cozy...Tyvek or not.


I am trying to save every penny for the Siding/Fireplace fund so the fact that everything out here was super cheap is a major bonus. The Pottery Barn pillow and lap quilt were both a dollar, yes a dollar, at the rummage sale I go to all the time. The tote with the pumpkins was $2 at Marshalls, probably because it was an awful purple color, and I painted it Whispering Wheat. The bushel basket was $1 at the flea market, along with the red watering can. And being married to the assistant principal has its perks because you get the left over mums from Homecoming:)


Another thing I accomplished was covering the cinder block foundation with a mortar compound. We really want to put up a stone veneer but that is not possible right now and the three different types of cinder block, some painted and some not, was driving me crazy. My goal is for this back part of our house to look cohesive because due to many additions and different owners "ideas" it did not when we purchased it.


Here I am with my mortar, this was quite a fun process I must say...and it was the most beautiful warm day, not a cloud in the sky, one of those days that makes you so thankful for everything. Six hours later my back was a hurtin' but I got it all covered.


 My son was also busy at work putting mortar on his own little house:)

While we did that Neal planed the floor from the back room/kitchen. 


150 years of grime and paint....


stripped off with a 12 inch Planer.

The wood looked like this before...


and like this after 4 or 5 times through the planer. I will be staining it to match the kitchen floor.


Hopefully it won't be too long before we can lay the floor back down and get the dry wall up. Stay tuned!